
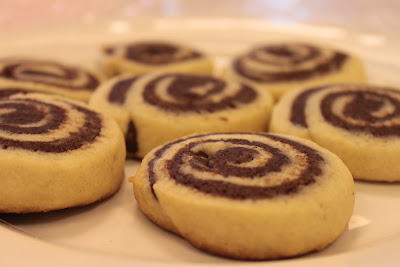
Pinwheel Cookies
3/4 cup butter
1 cup sugar
2 eggs
1 tsp. vanilla
2 1/2 cups all-purpose flour
1 tsp. baking powder
1 tsp. salt
2 tbsp. melted butter
6 tbsp. cocoa powder
- Begin by blending the butter, sugar, eggs and vanilla thoroughly. Stir flour, baking powder, and salt together; blend in. Chill for at least 1 hour (optional). Divide dough in half. In a separate bowl, stir 6 tablespoons of cocoa powder into 2 tablespoons melted butter. Knead cocoa/butter mixture into one of the dough halves until coloration is even. Set chocolate dough aside for now.
- Lay out a smooth, waterproof cloth (such as a tablecloth) onto a hard surface. Take the white dough and roll it out about 3/16" thick into an oblong, oval shape on the waterproof cloth. Roll out the chocolate dough the same size and shape as the white dough. Try and roll the two halves right next to each other, leaving a little bit of space between them. Now, this next step is a bit tricky, and may require two people. Using the cloth, flip the chocolate dough on top of the white dough. The chocolate dough should loosely stick to the cloth, allowing enough time to carefully lay it onto the white dough. Make sure to line up the edges as best as possible. Peel the cloth away from the dough, and make any needed corrections to the edges.
- Heat oven to 400 degrees. Roll up the layers of dough, beginning at the wide side. Using a sharp knife, cut 1/4" slices*, occasionally rotating the dough to maintain the roundness of each cookie. Place onto ungreased baking sheet. Bake 8-9 minutes.
*Note: when cutting the slices, don't press down with the knife or else the dough will just flatten. Gently move the knife back a forth across the dough, without using a lot of pressure.
So there you go! Hopefully my directions make sense. I originally got the recipe from this really old, well-used cookie book that is missing its outer cover and supported with tape. The recipe above has been tweaked a bit from the original, but I think the modifications were necessary. Have fun! :)